Friday, March 14, 2014

Forgetting to POST!

I've completely neglected my poor blog. Time to recap things!

DÜDLE! My wife Oz and I(mostly Oz) have been working on making a new drawing game! Check out all the details over at http://www.dudlegame.com/ ! The premise is to draw 5 cards(1 Adjective, 2 Nouns, 1 Verb, and 1 Adverb) then draw a picture using all 5 words in a phrase. After all the players have finished drawing everyone tries to guess the words in the pictures the other players drew. Simple! AND SO MUCH FUN! Try to guess what this was https://twitter.com/Bennwithtwons/status/444243906847596544

Oz and I also worked together on two more longboards! Both were made as presents for friends. While I really like my pin-tail board which is super long, the requesters asked for slightly smaller boards which had rounded front and back.  Since I re-cut my first board into a similar shape, I knew what I wanted them to look like however my re-cut board had some slightly peculiar curves along the sides. So, for these I drew up a new template.

The first board was for a friend who loves the color orange and is fond of bears, which you can see! I did the wood working and Oz did the paint job!

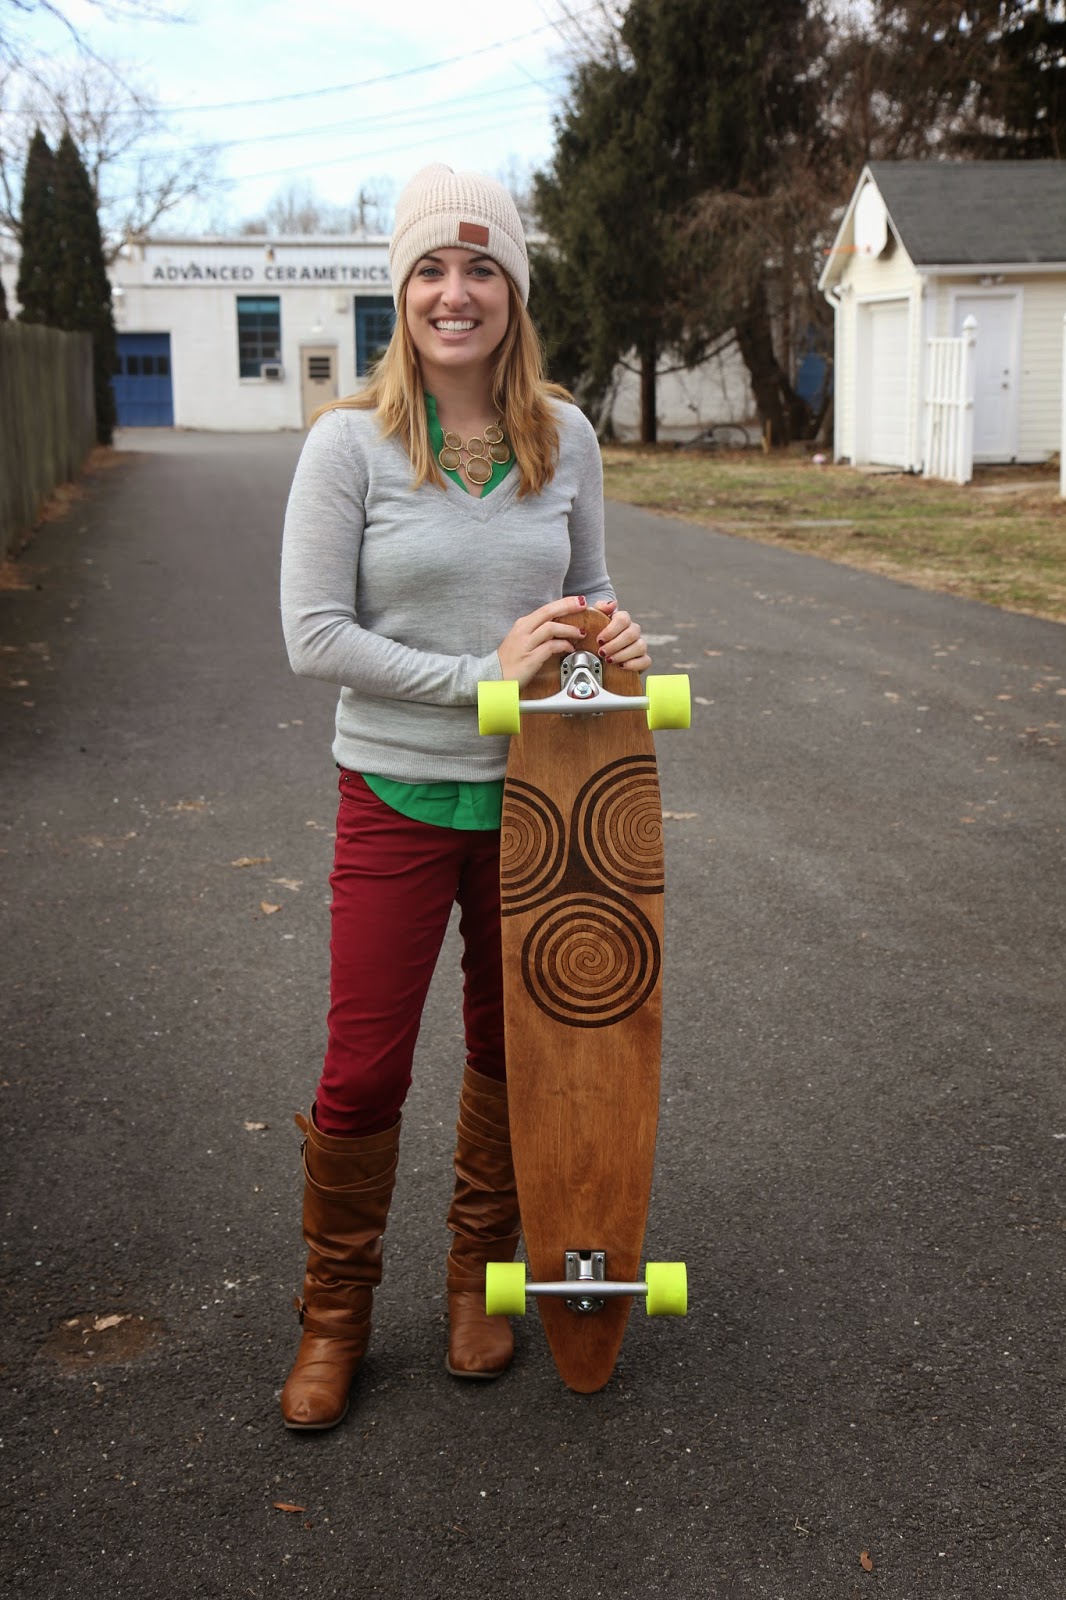
 The second board was for Oz's sister Kari! Again, while I did the wood work for the board, Oz did the images! For this board Oz did some wood burning rather than painting and it came out great! The triskele(triple spiral) on the bottom and hibiscus flowers on top.

Longboards aside, I haven't been making too much. I sewed a jacket for Halloween. Other than that just brainstorming an idea for comic... but really haven't put the time into it yet. Also I'm on the verge of making a fun little podcast with some friends just for fun.

Definitely more posts coming in the future and far more often! No more of these 6 month gaps!

Saturday, July 13, 2013

Tuesday, June 25, 2013

Longboards, pottery and other ideas!

Three months have gone by and a few additional things to update about. Back in April the town we're living in, Lambertville, had a street fair called Shadfest. To commemorate the event, Oz requested I make her a board as well... a SHADBOARD! Oh, by the way, "Shad" are fish don't ya know? So I used the last two sheets of baltic birch plywood to glue and cut her out a fish!


And as she's a much better painter than I am, she painted the top and bottom with acrylic. As you can see, the top is a fish and the bottom is fishbones!


After the shadboard was done, I found my old small beat-up skateboard. And not letting good parts go to waste, I pulled off the trucks and wheels and then cut up my prototype board. After a quick repaint, I now have another spare board for friends to come skating!


Also spent a little time on the pottery wheel and finally got around to glazing the bowls I made LAST summer.


The big brown bowl on the left is my favorite! Its big enough to fit a hearty meal!


On other notes:
-I started a new twitter with a psych idea... I'll link to it after it gets going... it's definitely weird.
-I'm making a longboard for Oz's sister but the weather has either been crumby or too hot(or I've been too lazy) to get it cut up and sanded outside.
-I need to take apart and fix up this flooded bass I picked up after Hurricane Sandy!
-I'm also planning on putting together some drawn comics... deal with it Other-Ben-Hatke!

Saturday, March 30, 2013

Summer Boards

Summer is coming! As is warm weather and time outside! In preparation, I decided to build a longboard skateboard. Here are the pics of my progress so far:

First I bought a 5 foot by 5 foot sheet of 1/4" Baltic Birch plywood. The Baltic birch plywood is important because the interior layers are made of actual wood rather than compressed sawdust like other plywoods. This quarter inch thick sheet has 5 layers of wood (plies). I divided the sheet into seven sections 10 inches wide. 1 section was 5 feet long, 6 sections were 4'2" long.


To make the longboard strong enough to hold up my weight, I glued multiple sections face to face. My prototype board was 2 sections(10 plies thick). You can see I used C-clamps to keep the two sections together while the glue set. Also the weights in the middle are making a curve in the board which you can see below.

Here's the board blank all glued and curved! I glued the board into the curved form because it'll give the board more leeway when someone stands on it. The board will bend downward when someone stands on it and a really low dip is unwanted. You don't want the board to bottom out and scrape the road!

Next I drew a pattern for the board shape and traced it onto the wood.

Next, I waited for a nice day outside and cut the shape out. Also, I did a bunch of sanding.

After the shape was cut, I drilled holes to attach the hardware.

Once the hardware was fitted properly, I took it back off to stain, paint, and clear coat. Then on the top side before the final clear coat dried, I sprinkled loose sand onto the board. This will give it grip, so you're feet don't slide off. People usually use griptape on the top of their skateboards but I wanted to the wood and stripes to be visible.

What's this? More clamps? This is board #2! The prototype turned out too flexible/bouncy. Also, I didn't really like how the shape of the protoboard turned out. It was bulbous. So, on to fixing the problems I had with the first board. For board 2, I used three sections of wood(15 plies total!) for additional strength/firmness. As the picture shows, I bought more c-clamps too!

I did the same steps as above for the second board. This time I changed the shape of the board and I think this version is far more aesthetically pleasing. The curve of the nose is a bit rounder, it's less wide in the midsection, and the tail is slightly wider

Drilled holes for the hardware.

Gave this board a bit more thought regarding the art design. Applied two coats of stain for a darker wood tone. Then added an asymetrical and colorful paintjob. Also painted the underside of the board with a variation of what's on top(topside below, bottomside below that)


Ta-Da! My first completed and functional board! 49 inches long, 8 1/2 inches wide. Oz has requested I make her a board as well. After I make her a board, if I'm still interested in making more I plan to make a 5 footer!

Saturday, February 9, 2013

GOODNESS! I've seemingly just completely forgotten about my blog! Remember that time I said I would update with pictures of things? Hah me too finally! Here's a round up of everything I can remember making in the past year-ish time frame...

So first off, from my last post, I mentioned how my wife and I didn't have rings when we eloped. We made sure to fix that the second time around when we had our ceremony and party with friends and family! I made my wife's ring and she made mine! One of her college friends has a whole metal working shop in her house and we gratefully used her equipment. Oz and I each bought some silver wire from a jeweler in Philadelphia. Cut the wire to size and hammered it into a circle.

Then soldered the two ring ends together...


Ground off some imperfections and created a hammered finish...

And Ta-Da! All done! (I'm way over simplifying the process here, it took all day, we learned a lot, and had so much fun!)

Additionally, for the wedding, I bought a cheap little balsa wood box from Michael's Craft Store and made it look REAL good. Sanded it first, tinted the wood with green water color paint, used my favorite Tru-Oil for a finish, then made a styrofoam insert with black felt covering. BAM! So pretty.

Next up! The long awaited pictures of the "finished" electric violin.


This is why is say "finished" because I never got around to making a cover for the electronic part. Mostly, I got discouraged from the fact the bloodwood made this violin FAR too heavy to ever manage playing it.

Next! A friend gave me a ridiculously old, cheap, busted-up banjo. I revived it enough to make it playable, not the best sounding banjo around but pretty good for a 1970's Korean made instrument.

Had reglued the wooden back piece and refinished it.

Put on new tuners!

And a fancy fifth string tuner, which isn't the usual 1 to 1 ratio. Which makes tuning the string easier.

Also made two more clay bowls! They only recently got fired. I was trying to make them bigger... the one of the left was the first try and was no where near large enough. The one on the right was the second attempt and indeed is ever so slightly larger.

Then lastly, made a silk screen print of a card game symbol. Just for fun and something to do, to kick me back into a creative mode!

Monday, March 5, 2012

The little things

I can't remember if I've mentioned in any of my recent posts that I got married back in November, regardless you most likely knew if you're reading my blog. BUT we didn't have full fledged wedding rings at the time and as a matter of fact we still don't. When we eloped Oz just continued to wear the bloodwood ring I gave her and I've been ringless for months! Solving that problem, I made myself a ring to wear! Two in fact!

The first ring I made myself was the white one shown in the picture below. A nicely barked tree fell down on the nearby towpath a few months ago and two weeks ago I took a branch from it. Whittled a section of the branch down and then Tru-oiled it. It is nice ring but I made it slightly too large and it is a softer wood resulting in a slightly bendy ring.

After wearing it for a week and being a bit unhappy with it(it looked like I had a band-aid on my finger). I went to work on the second ring in the picture below. Using my good trusty bloodwood scraps, I spent a good while on Saturday and Sunday shaping it down to size. I am exceptionally happy with my second outcome. I put a bit of tru-oil on it for a brilliant shine and it was all ready to wear. Now Oz and I have matching bloodwood bands until we get around to making silver rings!

As another side project, I gave my old, gothy snowboard bindings a new coat of paint! Primarily because I was invited to help chaperone a 6-8th grade ski trip but also I just didn't think they fit my personality anymore(even though the studded, bloody bindings obviously made me the coolest guy on the mountain). So first, I tore out the metal studs across the tops of the bindings. Easy squeezy.

Next, I sanded off some of the previous paint to rough up the surface which would make applying new paint easier.

Then it was time for lots of primer! I used gesso because it was what I had on hand. (Probably not the best choice)

A very thick coat of primer...

Next, two layers of bright red acrylic for a background color.

After that, I taped off the pattern I wanted with painter's tape and painted some electric blue acrylic. Pulling up the painter's tape resulted in these:

Now, the most obvious problem here is that I was using plain, old, boring, acrylic paint and didn't apply a clear coat or anything that would keep the paint from getting messed up. As a result, after one day of snowboarding a few minor damages occurred.


I'm still pleased by my rushed paint job and I'll look into methods of repainting them again with a more long lasting medium.

Until next time! (I'm still going to post pictures of the finished violin at some point)